I'm always looking for a yummy side dish that everyone will eat, and this one definitely made the cut. I found the recipe a few years ago, and after many changes I finally got it how I like it...super creamy and cheesy and full of flavor! It makes 6 servings, but is so tasty that there are times it is gobbled up even brfore the actual main dish.
Ingredients:
1 medium sweet onion finely chopped
1 10oz package frozen broccoli
4 tbl butter
1 can cream of mushroom soup
3 cups cooked wild rice
1 tbl minced garlic
2 stalks celery finely chopped
1 1/2 cups shredded Monterey jack/cheddar jack cheese
1 lb velvetta cheese, cut into 1" cubes
Celery salt
Pepper
What to do:
Preheat oven to 350*
In a skillet, melt the butter and sauté the onion and garlic until onions are tender and lightly browned. Set aside to cool.
Steam the broccoli until thawed. Drain and set aside to cool.
Heat the velvetta until it is melted and smooth, and then mix into the rice. Let cool.
Add the cooled rice mixture, cooled broccoli, cooled onions, can of soup, celery, & 1 cup shredded cheese.
Add celery salt and pepper to taste.
Put into an oven safe baking dish or casserole dish.
Top with the remaining 1/2 cup shredded cheese and cover with either an oven safe lid or foil.
Bake for 20 minutes then remove lid/foil and bake an additional 10-15 minutes or until cheese on top bubbles.
Tuesday, March 29, 2011
Friday, March 25, 2011
Super Creamy Banana Pudding Recipe
Growing up, we would often have banana pudding as dessert (especially since it is one of my father's comfort foods). So when I went off to college, anytime I felt homesick I would make some banana pudding and I would feel like I was sitting at the table with my parents and sister. The only thing was, even though it tasted delicious, to me it was always so heavy and thick. But a few years ago a coworker shared this amazing recipe that featured a lighter and airy version of banana pudding and I was hooked. So give it a try...you never know, it could become one of your family favorites too!
Ingredients:
2 bags of Pepperidge Farm Chessmen cookies (or if you're a traditionalist, 1 box of Nilla Wafers)
8-10 bananas sliced
2 cups milk
1 5oz box instant vanilla pudding
1 8oz package softened cream cheese
1 14oz can sweetened condensed milk
1 12oz container cool whip thawed
What to do:
Line the bottom of a 13x9x2 baking dish with cookies side by side
Layer bananas on top of the cookies
In a separate bowl, combine the milk and the pudding and blend together with a mixer.
In another bowl, combine the cream cheese and condensed milk together, mixing until smooth.
Fold the cool whip into the cream cheese mixture.
Add the cream cheese mixture to the pudding, and fold together until well blended.
Pour 1/2 the pudding mixture over the bananas.
Layer the remaining bananas over the pudding mixture.
Pour the remaining pudding mixture over the bananas.
Cover with another layer of cookies.
Refrigerate until ready to serve.
Remember, the longer you let it sit, the more moisture the cookies will absorb allowing them to become mushy. So if you like the cookies crunchy, serve immediately. Otherwise, if you make it the night before you plan to serve it, the cookies will be cake like (my favorite way).
Friday, March 18, 2011
Monkey Bread Recipe
If you have never had monkey bread, you are in for a treat. It is a delicious wet bread dessert filled with sweet cream cheese and apples. I make it for many of my parties, and it is usually devoted in minutes (and usually by one friend in particular, who also has requested I post this for her to make). So I hope you all enjoy!
Ingredients:
1/3 cup granulated sugar
4 tsp cinnamon
1 apple peeled, cored, and diced
8 oz cream cheese softened
2 12oz cans buttermilk biscuits
1 cup brown sugar
What to do:
Preheat oven to 350*
Mix granulated sugar, cinnamon, and cream cheese together until creamy and smooth.
Stir in diced apples.
Flatten out 1 uncooked bisquit and place a small spoonful of the cream cheese mixture in the center.
Wrap dough around the cream cheese and seal to make a pouch.
Repeat with remaining biscuits and cream cheese.
Melt butter and brown sugar, mixing together until smooth and sugar has dissolved.
Arrange biscuits in a bundt cake pan, overlapping each other until all are in pan
Pour brown sugar mixture on top of the biscuits and bake for approximately 30 minutes or until the top of the bread is browned and the sugar mixture is bubbly.
Let cool slightly and then invert pan onto a serving plate.
Best when served warm!
Tuesday, March 15, 2011
Leprechaun Hat Pit Trap
With St Patrick's Day coming up, I was on a hunt for something fun to create with my son. Many people have a tradition of making mischief on St Paddys, and I wanted to find some cute ways to "catch" the most famous of all Irish mischief makers...the leprechaun! And once again Disney's Family Fun came thru with a great idea. This adorable up-cycled Leprechan hat makes a great centerpiece for your St Paddys dinner (and my corned beef and cabbage recipe makes a great meal too) as well as a cute project to do with your little ones. To make it more fun, tell your kids this is a Leprechaun trap. Leprechauns have big egos, so a giant version of their own hat is irresistible to them. Once they step on the false top, you'll have caught a 10-gallon prize.
Items needed:Tall cylinder (such as an empty oatmeal container)
Green felt or green construction paper
Twigs
Wood Glue
Foil
Gold spray paint
Paper shamrocks
Black construction paper
Yellow construction paper
Double sided tape
Paper sign
How to make it:
 Take recycled oatmeal container, and wrap it with green felt (or paper) secured with double-sided tape. Then cut a wide strip of black construction paper and wrap it around the bottom of the hat secured with double sided tape. Cut a square of yellow paper with the center cut out and tape it to the center of the black paper strip with the double sided tape. Cut a large circle out of green felt (or paper) 1 1/2" larger than the container to make a brim, and place the container on top (you don't want to attach it so that you can get the leprechaun out easily). Using the double sided tape, tape shamrocks randomly all over the hat and brim. To make the trap, cut a hole in the lid (see image), then conceal it with a circle of green felt that will "give way when the leprechaun steps on it".
 Since leprechauns love gold, crumble a piece of foil into a ball and spray paint it with the gold paint. Place it on top of the trap door (as you need something lightweight to make sure it doesn't give way before the leprechaun comes).
Natural materials make these woodland creatures feel at home. Make a ladder from twigs held together with wood glue and place it leaning on the hat, making it an easy way for the leprechaun to reach the "gold".
Leprechauns love to break rules. Warning signs are sure to lure them in. You can make this out of a tent card (folded paper), left over cupcake decoration signs, etc with a cute message such as "Warning, dangerous ladder".

Monday, March 14, 2011
St. Patricks Day Corned Beef and Cabbage Recipe
It wouldn't be St Paddys without corned beef and cabbage, and it has taken me years to find a recipe that was yummy and desrving of such a fun holiday. So whether you are Irish or not, grab your green beer and begin cooking!
Ingredients:
1 3/4 lbs onions
2 1/2 lbs carrots
6 lbs corned beef brisket or round
1 cup malt vinegar
6 oz Irish stout beer (I actually use 1 bottle of guiness)
1 tbl mustard seed
1 tbl coriander seed
1/2 tbl black peppercorns
1/2 tbl dill seed
1/2 tbl whole allspice
2 bay leaves
3 lbs cabbage rinsed and cored
2 1/2 lbs small red potatoes scrubbed
1/2 cup course grain brown mustard (optional)
1/2 cup Dijon mustard (optional)
What to do:
Get a large stock pot (large enough to hold 4 gallons)
Chop up 1 cup of onions and 1 cup of carrots. Put the remaining whole onions and carrots to the side.
Place the corned beef onto a plate or prep sheet and press/rub the mustard seeds, coriander seeds, peppercorns, dill seeds, and allspice into the corned beef.
Place the corned beef into the stock pot, making sure any of the spices that fall off are scraped up off your prep sheet and placed in the pot as well.
Add the chopped onions, chopped carrots, malt vinegar, Irish stout beer, and bay leaves.
Add enough water to cover the corned beef and stir gently to combine.
Bring to a boil, cover, and simmer about 3 hours.
While the corned beef is cooking, slice the remaining onions into 8 wedges and the carrots into 2" chunks. Slice each head of cabbage into 8 wedges.
Once the corned beef is fork tender, add the onions, carrots, and potatoes to the pot. Stir a bit to combine, and then add the cabbage to the top.
Cover and return to a boil.
Reduce heat and simmer about 20 minutes, or until the potatoes and cabbage are fork tender.
When done, cut the corned beef against the grain and accompany with the cooked vegetables.
Serve with mustards as additional complimentary condiments...and don't forget the green beer!
Will feed 12 hungry guests.
Thursday, March 10, 2011
New Fan Page on Facebook
I just wanted to let everyone know I started up a fan page on Facebook...I'd love it if you all went there and "like" my page. I'll post any giveaways I find on there, as well as links to everything I post here so you can get to what you want quickly.
Thanks for all you love and support!
Meg
Thanks for all you love and support!
Meg
The Fabulous Bows from The Bitsy Beau
Recently I won a gift certificate to The Bitsy Beau from one of their Facebook giveaways. I had been admiring their headbands and bows for awhile, and had gotten to know the creator, Katrina, thru my EtsyMom team. So I was all sorts of excited to get to actually see the bows in person. And let me tell you...the photos so don't do them justice (and I thought the photos were amazing).
 First I decided to get a headband flower for a friend's baby shower. Her theme for the baby is birds and colors are pink, yellow and green, so this one was a perfect match. What you can't see in the photo is the beautiful details. The feather is a bright yellow, and the flower is a lime green with glittery sparkles. The one I got actually had a green pearlized button in the center, which I actually loved even more. I'm sure the mommy-to-be is going to love this when she gets it!

Then I decided to be selfish and get one for myself. As you all know, I am a huge Florida Gators fan as well as a Miami Dolphins fan, so the orange and blue headband screamed out "BUY ME!". I got it in an adult size, and even though I won't look nearly as adorable as the baby model above does wearing it, I think it looks quite wonderful. Don't worry, I'll do a follow up come football season with photos to prove how cute I look with this headband! :)
So if you have daughters, granddaughters, or are like me and just want a cute headband for yourself, you would be silly not to run over to The Bitsy Beau and buy up everything she has. You may want to hurry before I do!
Wednesday, March 9, 2011
Weaverwood 1000 Fan Winner!

The winner of Weaverwood's 1000 Fan Giveaway is....
Christy Crowley-Thompson!
Congrats (I'm so jealous)...please contact Weaverwood at jweaver2@sc.rr.com to claim your prize (and please give a shout out on their page to let everyone know who they can be jealous of).
And for those who didn't win, please go check out his store. It is full of such wonderful hand carved items that are sure to become heirlooms in your home. And if you fan his page, you can be entered into round two of giveaways!
Monday, March 7, 2011
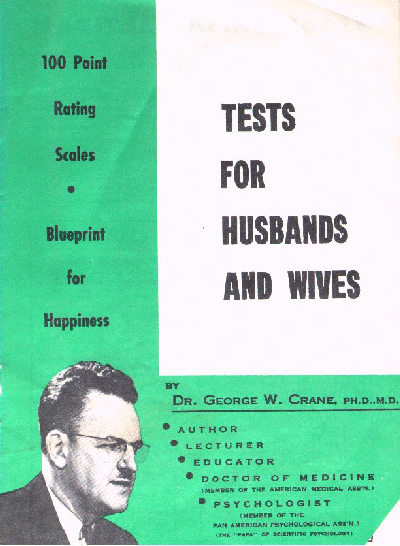
1930's Marital Rating Scale
Every day I look at my life and am thankful for what I have. I have a very supportive hubby and an adorable little monkey boy. But sometimes we all have bad days, and on those days we need a good laugh. And a reality check to make me even more thankful I wasn't around in the 1930's.
In the late 30's, a psychologist named George w. Crane, MD, PhD from Northwestern University thought it was a good idea to come up with a way to match up the perfect couples. So he interviewed 600 husbands and asked them about their wives positive and negative qualities. He then took those qualities and gave them each a a rating (mostly 1 point, some as much as 10 points) to total 100 points, which then are interpreted thru the rating scale to decide whether your wife is very poor to very superior. Don't worry though...he did the same scale for husbands too. Then he had applicants fill out the forms, and they were sent to a sorting machine to match people up. Even though I find this whole thing very silly, it actually was very popular and was used for matchmaking (think of it as your grandparent's Match.com) and resulted in more than 5,000 marriages. So take a seat with your significant other and see how you would each rate back then. I'm sure I'd be a complete failure...very poor indeed. But then again, so would my husband, so we'd be the perfect match!


In the late 30's, a psychologist named George w. Crane, MD, PhD from Northwestern University thought it was a good idea to come up with a way to match up the perfect couples. So he interviewed 600 husbands and asked them about their wives positive and negative qualities. He then took those qualities and gave them each a a rating (mostly 1 point, some as much as 10 points) to total 100 points, which then are interpreted thru the rating scale to decide whether your wife is very poor to very superior. Don't worry though...he did the same scale for husbands too. Then he had applicants fill out the forms, and they were sent to a sorting machine to match people up. Even though I find this whole thing very silly, it actually was very popular and was used for matchmaking (think of it as your grandparent's Match.com) and resulted in more than 5,000 marriages. So take a seat with your significant other and see how you would each rate back then. I'm sure I'd be a complete failure...very poor indeed. But then again, so would my husband, so we'd be the perfect match!


Sunday, March 6, 2011
Birthday Cake Bonanza
So awhile ago I had posted about making my son's birthday cakes, yet as my baby sister's 30th birthday bonanza weekend draws near, I realized I never posted pictures of the cakes I made. So here it goes!

So the first party was for him and his best friend Hannah (whose birthday is a week before him) in town for all our local friends to come to with a Mickey Mouse Clubhouse theme.
First I made the mouse ears with milk chocolate and black food gel

Then I made the glove, shoe garage, and slide out of white chocolate and food gel (the black parts are milk chocolate and black food gel).

I made the base of the clubhouse out of rice crispie treats and covered it with homemade marshmallow fondant. I then put the chocolate mickey head on top, and secured it with the sparkler candles.

Then came time to assemble. The cake base was a homemade almond cake with strawberry filling covered with green marshmallow fondant. I made the stepping stones and fence out of white chocolate, piped some green frosting for bushes and some reeses pieces for roses and just assembled it all together...now to hope it makes it to the party in one piece!


The next party was in South Florida with almost all our family and friends, and it was a Toy Story theme. I didn't take as many photos, but I'm glad I got this one. This is the bed frame made out of milk chocolate. I actually found photos of Andy's bed frame from the movie and copied every little detail...which I was so proud of.


So the first party was for him and his best friend Hannah (whose birthday is a week before him) in town for all our local friends to come to with a Mickey Mouse Clubhouse theme.
First I made the mouse ears with milk chocolate and black food gel

Then I made the glove, shoe garage, and slide out of white chocolate and food gel (the black parts are milk chocolate and black food gel).

I made the base of the clubhouse out of rice crispie treats and covered it with homemade marshmallow fondant. I then put the chocolate mickey head on top, and secured it with the sparkler candles.

Then came time to assemble. The cake base was a homemade almond cake with strawberry filling covered with green marshmallow fondant. I made the stepping stones and fence out of white chocolate, piped some green frosting for bushes and some reeses pieces for roses and just assembled it all together...now to hope it makes it to the party in one piece!

We made it in one piece! It was so heavy, but so very yummy!

The next party was in South Florida with almost all our family and friends, and it was a Toy Story theme. I didn't take as many photos, but I'm glad I got this one. This is the bed frame made out of milk chocolate. I actually found photos of Andy's bed frame from the movie and copied every little detail...which I was so proud of.
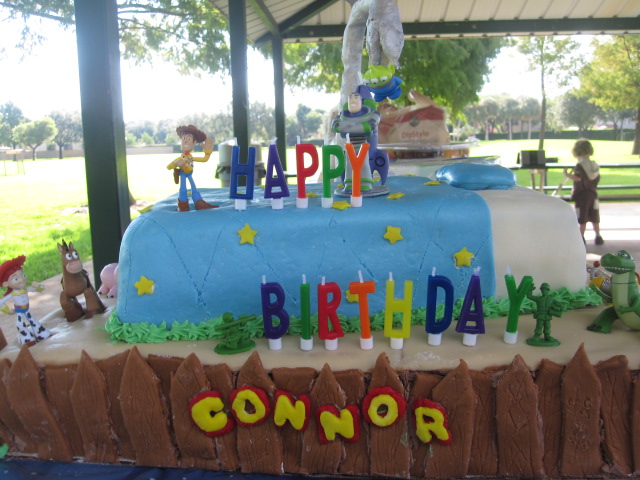
But unfortunately, as you can see from the finished product, it didn't make the drive down. Thankfully the rest of the cake did. The bottom layer was chocolate cake with raspberry filling (all homemade of course), and I made little wooden planks out of marshmallow fondant and put them around the cake to make a corral for Woody's gang. The top cake I made to match Andy's bed from the movie (minus the bed frame now...so sad) and it was almond cake with strawberry filling, covered with marshmallow fondant. The final touch was the silver "claw" I made out of white chocolate that had the alien dangling from it over Buzz's head.

Overall, it still turned out great, and I got lots of compliments on it (and it tasted amazing as well!).
Oh, and don't think I was going to forget my husband for his birthday. The poor guy was born on December 25th, so he never gets to do anything special for his birthday. Since he shares it with one of his favorite musicians, Jimmy Buffett, I decided to surprise him with some cupcakes that we brought with us to a friend's Christmas dinner.

I called them my "Cheeseburgers in Paradise". I made 18 regular vanilla cupcakes and 6 brown dyed vanilla cupcakes (b/c my husband hates chocolate...but that's for another blog to vent about). I cut the regular ones in half, and the brown ones in thirds. I placed the brown ones on the bottom half of the regular ones, topped it with red "ketchup" frosting, yellow "mustard" frosting, green "lettuce" coconut shreds, and yellow "cheese" marshmallow fondant. Then I put the top on, sprinkled it with some raw sugar for the sesame seeds, and voila...cheeseburger cupcakes! When we arrived at the party, people thought I brought sliders...they were all shocked to find out they were cupcakes. Big hit...and again so yummy.
Friday, March 4, 2011
I'm Wild About Wildtree Omaha - Khristine
As you all know, lately I have been in a giveaway kind of mood; both submitting my jewelry for people to win as well as entering some to try to win items that I can then try and see if I like. The most recent item I won was some Strawberry Dark Chocolate Jam from Wildtree Omaha - Khristine.

If you don't know about Wildtree, you should. They make all natural foods, mixes, and seasonings that are great for us busy moms to use. They don't use any MSGs, preservatives, dyes, peanuts, additives, and are low in sugar and sodium. This is all very important to me as my son is very hyper all of a sudden, and I have begun to worry that food allergies may be the culprit ( it runs in the family). Also, after my dad had a heart attack last year, my whole family began rethinking our way of eating. So needless to say I was very excited to win and get a chance to try this company's food.
I received my jam very quickly, and as always, it didn't sit around very long before I had to try it. So I toasted up some bread, and slathered on this delicious smelling jam. At first bite I was hooked. There were big chunks of strawberries throughout, and the dark chocolate was not at all overpowering. It was more like just a hint of cocoa, which hit my taste buds at the end. Absolute perfection! I can just imagine how yummy this will be on my banana bread (don't worry, that recipe is coming soon).
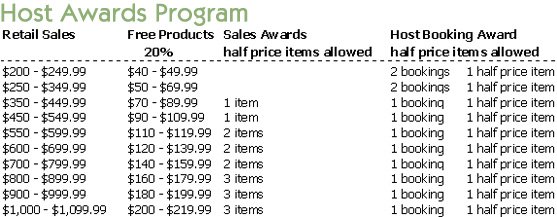
The coolest thing is you can actually get stuff free! I'm sure you have all attended a candle party/tupperware party/lingerie party etc. This is similar, but you can do it online. If you contact Khristine about hosting a virtual party, she creates an event for you on her website. Then you send an email to all your friends and family telling them about your online party. All items ship directly to each person that orders and you can leave the party open for as long as you want. Once you reach $200 in sales, you start getting discounts/freebies etc ( see the host promotion chart below that she let me borrow) including a free Host Promotion product (each month is different).
So for those of you who are looking for a great way to feed your family in a rush without having to sacrifice health and taste, you should really check it out!

If you don't know about Wildtree, you should. They make all natural foods, mixes, and seasonings that are great for us busy moms to use. They don't use any MSGs, preservatives, dyes, peanuts, additives, and are low in sugar and sodium. This is all very important to me as my son is very hyper all of a sudden, and I have begun to worry that food allergies may be the culprit ( it runs in the family). Also, after my dad had a heart attack last year, my whole family began rethinking our way of eating. So needless to say I was very excited to win and get a chance to try this company's food.
I received my jam very quickly, and as always, it didn't sit around very long before I had to try it. So I toasted up some bread, and slathered on this delicious smelling jam. At first bite I was hooked. There were big chunks of strawberries throughout, and the dark chocolate was not at all overpowering. It was more like just a hint of cocoa, which hit my taste buds at the end. Absolute perfection! I can just imagine how yummy this will be on my banana bread (don't worry, that recipe is coming soon).
The coolest thing is you can actually get stuff free! I'm sure you have all attended a candle party/tupperware party/lingerie party etc. This is similar, but you can do it online. If you contact Khristine about hosting a virtual party, she creates an event for you on her website. Then you send an email to all your friends and family telling them about your online party. All items ship directly to each person that orders and you can leave the party open for as long as you want. Once you reach $200 in sales, you start getting discounts/freebies etc ( see the host promotion chart below that she let me borrow) including a free Host Promotion product (each month is different).

So for those of you who are looking for a great way to feed your family in a rush without having to sacrifice health and taste, you should really check it out!
Subscribe to:
Posts (Atom)